
What is an NBI Clearance?
As its name implies, getting a clearance from the National Bureau of Investigation (NBI) is an official assurance that you have no criminal cases filed against you in the Philippines. As such, an NBI clearance is an important document to have when you apply for a job, start a business, or for working or studying abroad.
The NBI clearance contains your name, address, place of birth, date of birth, date of issuance, and purpose for requesting it. It is only valid for 6 months to 1 year, which makes a lot of sense. While unlikely, there's always a slim possibility that one could become involved in a criminal case.
Getting an NBI clearance used to take hours of waiting in line - but not anymore. NBI implemented an online application system for booking appointments, which makes the whole process a lot more convenient. We'll show you how to get an NBI clearance online in this step-by-step guide.
Tip: Sign up to Coins.ph and use it to make an NBI online payment
How to Apply for an NBI Clearance Online
It's actually really easy to book your appointment using this new system. We'll walk you through each step, complete with screenshots so you don't get lost!
Step 1: Register on the official NBI Clearance website.
Go to the official website to register as a new account.
Step 2: Enter the required information.
Fill up all the necessary details and save your information. Check your details then click on the button on the upper right to apply.
Step 3: Enter your ID details.
Select the ID you'll present during your appointment then enter your ID number. Click Agree.
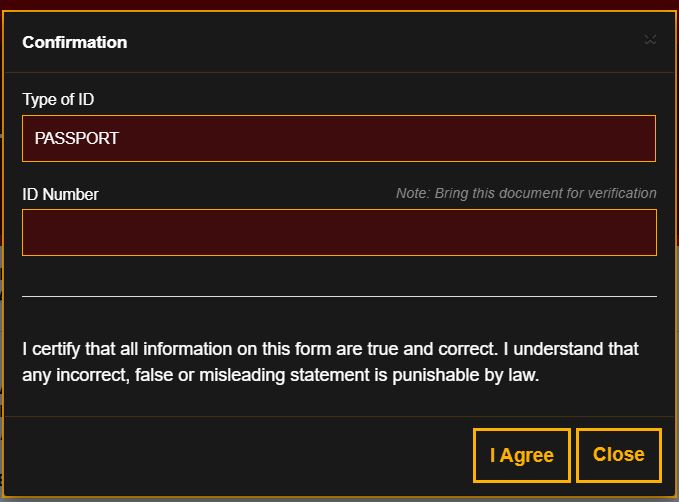
You can choose among the following valid IDs:
- Voter’s ID
- SSS ID
- PRC License
- Passport
- Postal ID
- Driver’s License
- GSIS UMID
- School ID
- Alien Certificate of Registration
- Philhealth
- Tax Identification Number (TIN) ID
- NSO Authenticated Birth Certificate
- Senior Citizen Card
- Copy of Previous NBI Clearance
If the NBI clearance is one of your first IDs, you can present your birth certificate as proof of identification.
Step 4: Select your preferred date and location.
Choose your preferred location and date.
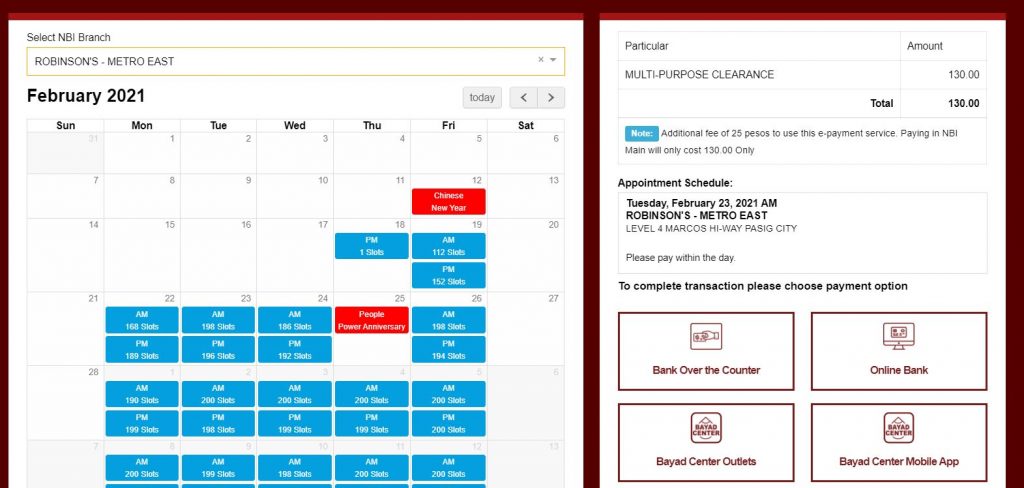
Tip: Select Bayad Center Outlets as your mode of payment to pay your NBI clearance using your Coins Wallet. Create a Coins.ph account here or download the app for free on Google Play and the App Store.
Step 5: Take note of your reference number.
A reference number will pop up. Take note of this number along with how much you have to pay. You will need this when you use your Coins Wallet to pay for your NBI Clearance application.
How to Pay for NBI Clearance Online with Coins.ph
Good news for Coins.ph customers. Pay bills online with your Coins Wallet - including your NBI clearance! Here's how:
Step 1: Open your Coins.ph Wallet app and tap on Pay Bills.
Don’t have a Coins account yet? Download the app for free on Google Play or the App Store. You can also sign up for an account on https://coins.ph
Step 2: Scroll down and choose NBI Clearance.
Step 3: Enter your exact payment amount then tap Next.
Don’t have enough funds in your Coins Wallet to pay your bill? Cash in or add funds instantly through online banking or e-wallet apps (Read: Coins.ph Online Cash In Options). Other options include 7-Eleven, Palawan Pawnshop, Western Union, and more. See all cash in options
Step 4: Enter the Reference Number from your NBI application and input your Mobile Number. Tap Next.
Step 5: Review your payment information and then Slide to Confirm to complete your transaction.
And that’s it! With Coins.ph, you can pay government bills such as NBI Clearance and PAG-IBIG anytime and anywhere.


)